

How to set up multiple partitions on a USB flash drive on Windows 10
On Windows ten, you ordinarily connect a USB flash bulldoze to your device, employ the format tool to ready upwardly the compatible file system, and and so start dumping files on it. While there'south nothing wrong with this approach, at that place a number of scenarios where dividing the drive into multiple partitions can bring additional benefits.
For instance, if y'all work in a mixed Bone surroundings, and you lot would typically format your USB wink drive using the exFAT file arrangement on Windows ten, unless you use workarounds, you won't be able to admission the files from a Linux machine. Instead of switching to a different file arrangement, you lot can configure one partition compatible with Windows 10 and another compatible with Linux.
If yous have to piece of work with a flash drive formatted using FAT32, yous can simply use up to 32GB of space, and if the drive is large, you could be wasting a lot of storage. The ability to dissever the storage on the device lets you create additional partitions with the aforementioned or a different file system to have reward of the entire drive. As well, if you carry around a pollex drive with sensitive data, creating multiple partitions can create storage for piece of cake admission to app installers and other non-disquisitional files and some other one that you tin can encrypt with BitLocker to protect sensitive information.
Whatever the reason, y'all tin utilise the Disk Management tool on Windows 10 to set up multiple partitions on a USB flash bulldoze to keep different groups of information separate or configure a bulldoze with diverse file systems.
In this Windows 10 guide, nosotros walk you through the steps to separate a flash drive into multiple partitions, and nosotros prove you the steps to password-protect a partition using BitLocker.
- How to create multiple partitions on a USB flash drive
- How to create multiple partitions with countersign protection on a USB flash bulldoze
Of import: This process will delete everything on the drive, so you should back upwardly any information of the flash drive before proceeding.
How to create multiple partitions on USB flash bulldoze
Although the process to create multiple partitions on a removable drive involves a number of steps, it's not complicated. You only need to erase the drive and set up the new storage layout.
Erasing a flash drive
To clean a removable flash drive using Disk Direction, use these steps:
- Open Start.
- Search for Deejay Management and click the top result to open the experience.
-
Correct-click the flash drive that y'all desire to configure, select the Delete volume option.

- Click the Yes button.

Once yous complete these steps, the data on the drive volition be deleted, and you'll end up with a large unallocated infinite.
Creating multiple partitions flash drive
To create multiple partitions on a USB flash bulldoze, use these steps:
- Open Offset.
- Search for Disk Management and click the tiptop effect to open up the experience.
-
Right-click the Unallocated space, and select the New Merely Value option.

- Click the Next button.
-
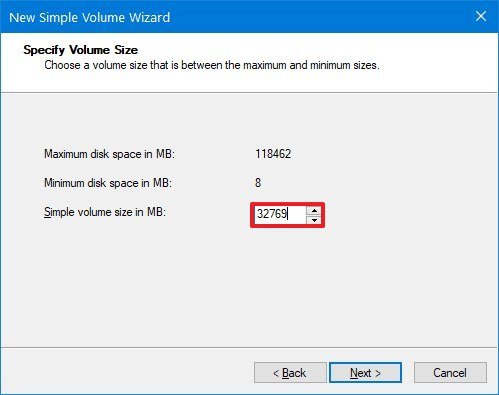
Under the "Simple volume size in MB" section, specify the amount of space in megabytes that you want to allocate for the outset partition.
- Click the Next button.
-
Apply the "Assign the post-obit drive letter" drop-down carte to select a letter for the new drive.

- Click the Next button.
-
Utilise the "File system" drib-downward menu, and select the exFAT option.

Tip: If you lot're using a flash drive larger than 32GB, you won't see the option to format using the FAT32 file organization. In the event that yous need to use the FAT32 option, make the partition size less than 32768 megabytes. If you want to utilise the exFAT option, make the partition larger than 32769 megabytes. If you want to use exFAT on a sectionalization that's less than 32GB, create a FAT32 sectionalisation, and so use the "Format" tool to change the file system to exFAT.
- Utilize the "Allocation unit size" drib-down menu, and select the Default option.
- In the "Value label" field, type a descriptive name for the bulldoze.
- Check the Perform a quick format option.
- Unless necessary, clear the Enable file and folder compression choice.
- Click the Side by side button.
- Click the Finish push.
-
Right-click the remaining Unallocated space, and select the New Simply Value selection.

- Click the Next button.
-
Under the "Simple volume size in MB" section, specify the amount of space that yous want to classify for the second partition. (If you're only creating two partitions, you don't need to change this setting.)

- Click the Next push button.
-
Use the "Assign the following drive alphabetic character" drop-down menu to select a letter for the new bulldoze.

- Click the Adjacent button.
-
Use the "File system" drop-down bill of fare, and select the NTFS option (or the file system that you want to utilize).
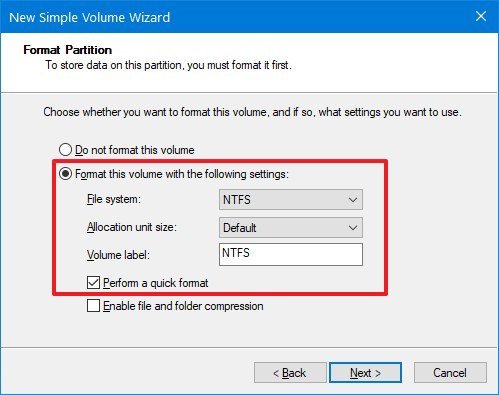
- Use the "Allotment unit of measurement size" drop-downwardly carte du jour, and select the Default option.
- In the "Value characterization" field, blazon a descriptive proper noun for the drive.
- Cheque the Perform a quick format option.
- Unless necessary, clear the Enable file and folder compression selection.
- Click the Side by side push button.
- Click the Terminate button.


After completing the steps, you'll end up with a USB wink drive that includes multiple partitions and dissimilar file systems (depending on your configuration), so you can use the drive on unlike OSes without worrying almost compatibility or to keep content separate.
If you're in the marketplace for a large USB flash drive yous can employ to create multiple partitions, we recommend the SanDisk Extreme Go because of its storage capacity, reliability, and cost.
Reliable storage

SanDisk Farthermost Get
When you have to have a lot of files on the go, the SanDisk Extreme Become (CZ800) is an first-class choice. The USB bulldoze offers up to 128GB of storage with fast transfers speeds up to 200MB/s, it'south backed past the strong brand, and it's besides affordable, at effectually $32 for 128GB.
How to create multiple partitions with password protection on a USB flash bulldoze
Another instance when using multiple partitions can come in handy is to prepare up a USB flash drive with a partition to store non-critical files, and another i protected with BitLocker to acquit sensitive data. (BitLocker is merely available for Windows 10 Pro and Enterprise. Also, you won't exist able to unlock the drive on non-Windows devices.)
Division flash drive
To create two partitions on a USB wink drive, use these steps:
- Open up Offset.
- Search for Disk Management and click the elevation upshot to open up the experience.
-
Right-click the Unallocated space, and select the New Simply Value choice.
- Click the Next push button.
-
Under the "Simple volume size in MB" section, specify the amount of infinite in megabytes that you want to allocate for the sectionalisation that will exist available to anyone who connects the drive to a reckoner.
- Click the Next push.
-
Utilize the "Assign the following drive letter" drop-down menu to select a letter for the new bulldoze.
- Click the Side by side button.
-
Use the "File arrangement" driblet-downward menu, and select the exFAT option.
- Use the "Allocation unit size" drop-down menu, and select the Default option.
- In the "Value label" field, type a descriptive proper name for the drive.
- Cheque the Perform a quick format option.
- Unless necessary, articulate the Enable file and folder compression option.
- Click the Next button.
- Click the Terminate push.
- Echo steps No. three through No. xv to create another partition to protect with BitLocker.
After you complete these steps, you'll stop upwards with two partitions on the removable bulldoze, and the only affair left to do is to use BitLocker to encrypt the sectionalisation that will hold your important files.
Setting upwardly BitLocker on a flash drive
To fix BitLocker on a USB flash drive, use these steps:
- Open Control Console.
-
Click on Arrangement and Security.

-
Click on BitLocker Drive Encryption.

- Under the "Removable data drives" section, expand the storage that you desire to protect with BitLocker.
-
Click the Turn on BitLocker choice.

-
Check the Utilize a countersign to unlock the drive option.
-
Create a password to encrypt the thumb drive segmentation.

- Click the Next button.
-
Click the Save to a file button.

-
Select a location to shop the recovery key.
Tip: If you lot forget the countersign or lose the recovery key, yous won't exist able to recover your files, so make sure to keep this file in a secure place.
- Click the Relieve button.
- Click the Next button.
-
Select the Encrypt used disk space only pick.

- Click the Adjacent button.
-
Select the Compatibility way selection.

- Click the Next button.
-
Click the Start encryption button.

- Click the Close button once the encryption has finished.


Later completing these steps, the flash drive will include a partitioning to store any files using a compatible file arrangement and some other password-protected partition to save important data.
Accessing an encrypted bulldoze
To admission the sectionalization encrypted with BitLocker, connect the flash drive to a Windows device, and use these steps:
- Open File Explorer.
- Click on This PC from the left pane.
-
Under the "Devices and drives" section, double-click the encrypted drive (the ane with the lock icon).

-
Type the BitLocker password.
Quick tip: If you lot can't recall the password, click the More options link, click the Enter recovery key option, and type the 48-digit recovery key available in the text file that y'all should have saved when setting upward BitLocker.
- Click the Unlock button.

Afterward you complete these steps, you'll be able to access the drive and its contents. If yous want to lock it, you'll need to disconnect and reconnect the drive again. Also, because y'all're using BitLocker To Become, you'll be able to unlock the bulldoze on whatsoever compatible calculator.
This guide is focused on flash drives, but yous can apply these instructions to whatever kind of removable or fixed storage drive. Also, you can use these steps on virtually any version of the OS, including Windows eight.1 and Windows seven.
More than Windows 10 resource
For more than helpful articles, coverage, and answers to common questions near Windows x, visit the following resources:
- Windows 10 on Windows Central – All you demand to know
- Windows 10 aid, tips, and tricks
- Windows 10 forums on Windows Central
We may earn a commission for purchases using our links. Larn more.

Source: https://www.windowscentral.com/how-set-usb-flash-drive-multiple-partitions-windows-10
Posted by: shirkgrany1969.blogspot.com
0 Response to "How to set up multiple partitions on a USB flash drive on Windows 10"
Post a Comment